
Partition Magic Software Partition magic software for Windows Server 2000/2003/2008/2008 R2/2012/2012 R2, Windows XP/Vista/7/8/8.1/10, etc.
How to create partition after Windows installed
During installing Windows, you are given chances to create partitions via the New feature:

Well, how to make partitions after Windows installed? In this post, we will introduce 3 ways.
Once the program has been installed, please launch it to get the main window:

Then, you have 2 choices to create partition:
Option 1: split a large partition
Please select the large partition and choose "Split Partition" feature from the left side.
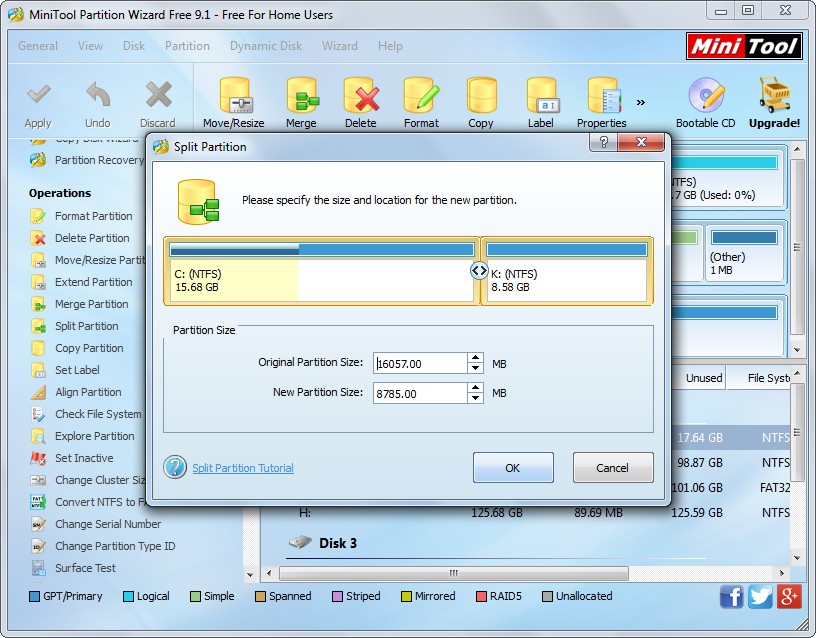
Then, drag the sliding handle to change partition size, and click "OK".
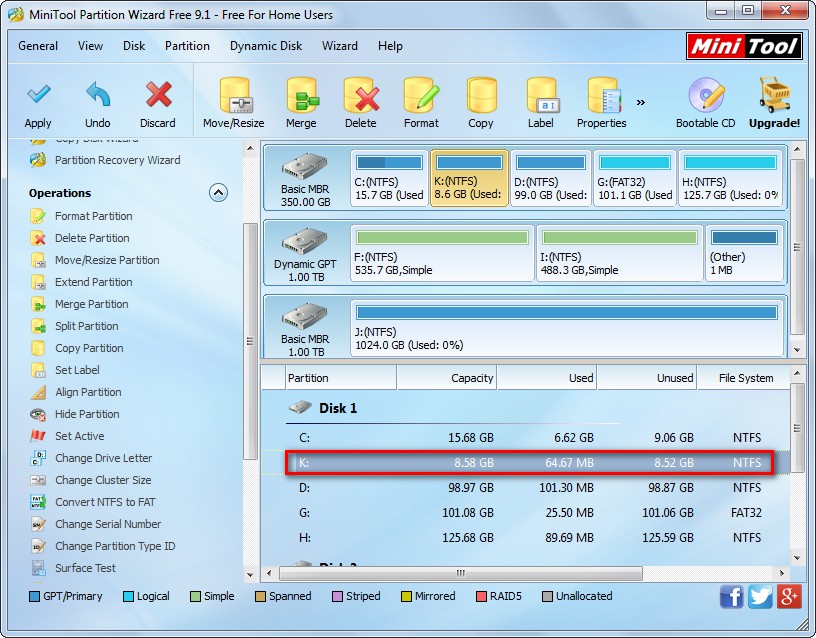
Now you can see a new partition is created without your formatting. At this time, users only need to click "Apply" button to make this change performed.
Option 2: shrink a large partition to create a new one
Please select the large partition you want to shrink, choose "Move/Resize Partition" feature from the left side.
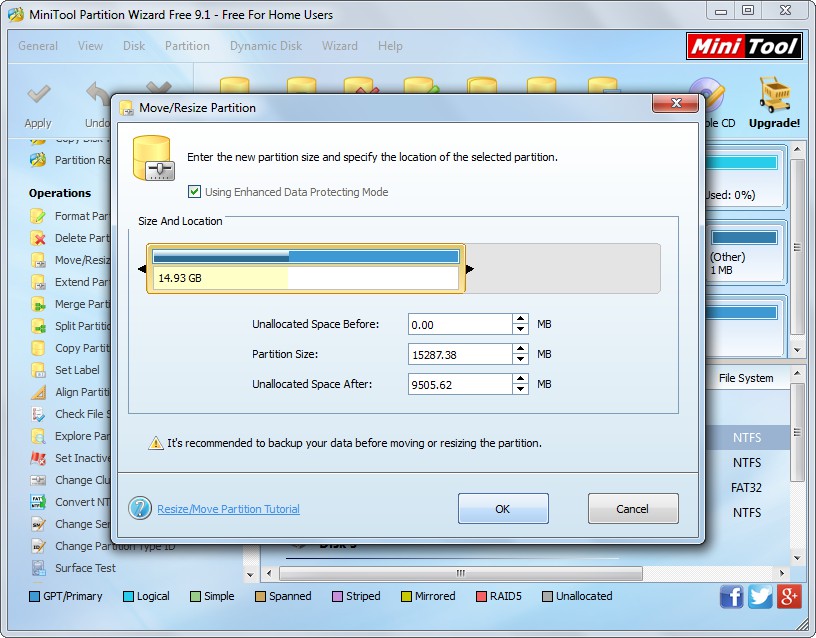
Then, shorten partition handle to create an unallocated space and click "OK".
Next, create a new partition in the unallocated space and apply all changes.
However, if you are unwilling to use third party program, do it in Disk Management or Diskpart.

Then, type the following commands to create new partition(s):
List disk
Select disk N
(N represents the number of the disk where you want to create partition) Select partition n
(n represents the partition you want to shrink)
Shrink desired=desired size
(for example, if you want to shrink 10GB space from the selected partition, you need to type shrink desired=10240)
Create partition primary size=desired size
(for example, you can create a 20GB partition by typing create simple volume size=2048)
Select partition N
(N is the number of the partition you create just now)
Format quick fs=ntfs
Assign
Exit
Each command should be followed by pressing on Enter key.
Tip: diskpart has the same limitations as Windows Disk Management.
Now, all of you would know how to create partitions after Windows has been installed. Try one of these 3 methods now.
Well, how to make partitions after Windows installed? In this post, we will introduce 3 ways.
How to Create Partitions after Windows Installed: Create Using Free Partitioning Tool
With excellent partitioning tool, you can create partitions in Windows very easily, and the freeware MiniTool Partition Wizard is worth trying since it is easy to use and safe enough to operate.Once the program has been installed, please launch it to get the main window:
Then, you have 2 choices to create partition:
Option 1: split a large partition
Please select the large partition and choose "Split Partition" feature from the left side.
Then, drag the sliding handle to change partition size, and click "OK".
Now you can see a new partition is created without your formatting. At this time, users only need to click "Apply" button to make this change performed.
Option 2: shrink a large partition to create a new one
Please select the large partition you want to shrink, choose "Move/Resize Partition" feature from the left side.
Then, shorten partition handle to create an unallocated space and click "OK".
Next, create a new partition in the unallocated space and apply all changes.
However, if you are unwilling to use third party program, do it in Disk Management or Diskpart.
How to Make Partitions after Windows Installed: Create in Disk Management
Please press on Win and R keys to call out Run, then type diskmgmt.msc to open Windows Disk Management utility, right click the large partition, and choose "Shrink Volume" to create an unallocated space. Then, create new partition(s) in the unallocated space.
Note: the "Shrink Volume" feature will be grayed out if you are going to shrink an FAT partition. In addition, old versions of Windows, such as Windows XP and Windows Server 2003, are not configured with this feature.
How to Create Partitions after Windows Installed: Create Using Diskpart
Please type diskpart in Search box, and run this program as administrator.Then, type the following commands to create new partition(s):
List disk
Select disk N
(N represents the number of the disk where you want to create partition) Select partition n
(n represents the partition you want to shrink)
Shrink desired=desired size
(for example, if you want to shrink 10GB space from the selected partition, you need to type shrink desired=10240)
Create partition primary size=desired size
(for example, you can create a 20GB partition by typing create simple volume size=2048)
Select partition N
(N is the number of the partition you create just now)
Format quick fs=ntfs
Assign
Exit
Each command should be followed by pressing on Enter key.
Tip: diskpart has the same limitations as Windows Disk Management.
Now, all of you would know how to create partitions after Windows has been installed. Try one of these 3 methods now.
Windows Partition Magic
- You Can Recover Partitions and Files Even After Diskpart Clean
- Want to Transfer Windows 10/8/7 to SSD? Follow This Tutorial
- Recover Missing Hard Drives of Windows 10 in Simple Steps
- To Fix RAW Drive in Windows: Here Are 3 Simple Ways
- Windows System Partition Is Full? Enlarge It Now
- To Partition SD Card in Windows, You Can Use This Tool
- 3 Ways to Fix Missing Operating System Issue in Windows 8
- Want to Merge 2 Partitions in Windows? Here Are Methods
- How to Format External Hard Drive to FAT32 in Windows
- Can't Reduce Partition C of Windows 10 to Desired Size? Try This Way
- How to Create Partition after Windows Has Been Installed Guide
- Basic Disk Will Convert to Dynamic? Here Are Solutions
- Quickly Fix "The Selected Disk Is of GPT Partition Style"
- Detailed Steps to Remove Mysterious Partitions in Windows 10
Copyright (C) 2018 www.partition-magic.com, All Rights Reserved. PartitionMagic ® is a registered trademark of Symantec Corporation.