
Partition Magic Software Partition magic software for Windows Server 2000/2003/2008/2008 R2/2012/2012 R2, Windows XP/Vista/7/8/8.1/10, etc.
Basic Partitioning Operations
Here you can learn how to accomplish basic partitioning operations (create, format, delete) supported by the program. To meet the requirements of any user these operations can be accomplished either with the help of easy-to-use wizards or through the corresponding dialogs.
Create Partition
The program provides the ability to create new partitions by using the DOS partitioning scheme is a set of rules, constraints and format of the on-disk structures to keep information on partitions located on a hard disk. There are known several partitioning schemes. The most popular of them is the so-called DOS partitioning scheme. It was introduced by IBM and Microsoft to use multiple partitions in the disk subsystems on IBM PC compatible computers. Another popular partitioning scheme is the so-called Logical Disks Model (LDM) that originates from the UNIX mainframe systems. Veritas Executive accommodates a simplified version of LDM to the Windows 2000 operating system. Windows 2000 and XP support two quite different partitioning schemes: the old DOS partitioning scheme and the new Dynamic Disk Management (DDM). The problem is that earlier versions of Windows do not support DDM. In addition, most hard disk utilities do not support it as well..
Restrictions
1. Do not use the Create Partition function in order to undelete the last deleted partition.
2. The program cannot create new partitions on Dynamic Disks. The current version of the program supports only hard disks that use the DOS partitioning scheme (in Windows 2000 and XP these disks are named Basic Disks).
3. According to the rules of the DOS partitioning scheme, the following combinations of partitions cannot be created:
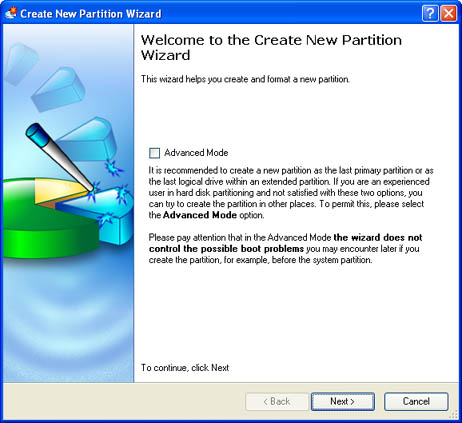
Starting Wizard
There are several ways to start the Create Partition Wizard:
After following one of the above mentioned actions, the Welcome page of the wizard is displayed.
Starting Dialog
In order to start the operation the user should take the following steps:
1. Select a block of free space on the Disk Map.
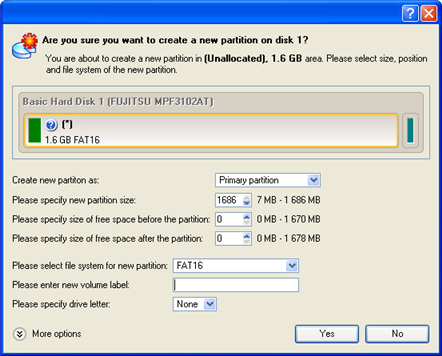
2. Call the Create Partition dialog to define appropriate settings:
Settings
Despite different work algorithms, both the Create Partition Wizard and the Create Partition dialog provide the same level of functionality, thus let us just take as an example the dialog version of the operation.
Define the future partition parameters with the Create Partition dialog. Initially the program suggests some consistent values for all parameters. In most cases, the user can just press the Yes button to confirm the operation.
After the operation is completed the user receives a fully functional partition.
Format Partition
Any partition should contain some file system to be used for keeping data. The process of installing a file system is commonly known as formatting. A huge variety of file systems have been developed these days. The program provides the ability to format existing or newly created partitions of the following file systems:
- FAT12 & FAT16
- FAT32
- NTFS
- Ext2
- Ext3
- ReiserFS
- Linux Swap v. 2
- HPFS
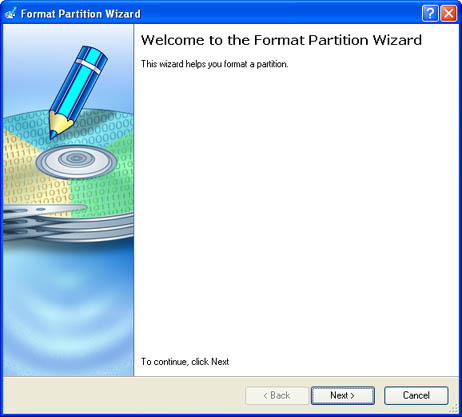
Starting Wizard
There are several ways to start the Format Partition Wizard:
Starting Dialog
In order to start the operation the user should take the following steps:
1. Select a block of free space on the Disk Map.
2. Call the Format Partition dialog to define appropriate settings:
Despite different work algorithms, both the Format Partition Wizard and the Format Partition dialog provide the same level of functionality, thus let us just take as an example the dialog version of the operation.
Define parameters of the formatting operation with the Format Partition dialog. Initially the program suggests some consistent values for all parameters. In most cases, the user can just press the Format button to confirm the operation.
After the operation is completed the user receives a fully functional partition formatted to the file system specified.
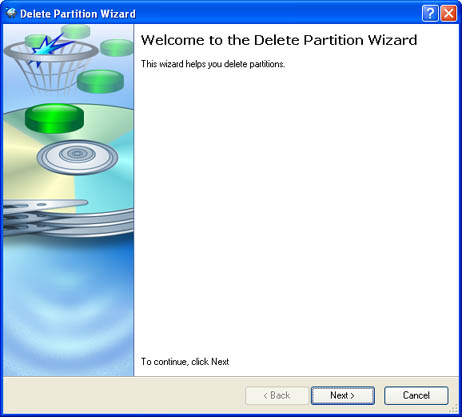
Delete Partition
The program allows the user to delete partitions on hard disks partitioned with the DOS partitioning scheme. The program removes references to the partition from the Partition Table, so that the information from the deleted partition becomes inaccessible. The resulted disk space can be used to create new partitions.
Contents of the deleted partition do not disappear from the disk but merely are unavailable for the operating system.
Starting Wizard
There are several ways to start the Delete Partition Wizard:
After following one of the above mentioned actions, the Welcome page of the wizard is displayed.
Starting Dialog
In order to start the operation the user should take the following steps:
1. Select a block of free space on the Disk Map.
2. Call the Delete Partition dialog to define appropriate settings:
Settings
Despite different work algorithms, both the Delete Partition Wizard and the Delete Partition dialog provide the same level of functionality, thus let us just take as an example the dialog version of the operation.
Define parameters of the delete operation with the Delete Partition dialog.
Results
The deletion of a partition takes only a fraction of a second. However, the program waits until Windows completes the modification of the disk layout.
Create Partition
The program provides the ability to create new partitions by using the DOS partitioning scheme is a set of rules, constraints and format of the on-disk structures to keep information on partitions located on a hard disk. There are known several partitioning schemes. The most popular of them is the so-called DOS partitioning scheme. It was introduced by IBM and Microsoft to use multiple partitions in the disk subsystems on IBM PC compatible computers. Another popular partitioning scheme is the so-called Logical Disks Model (LDM) that originates from the UNIX mainframe systems. Veritas Executive accommodates a simplified version of LDM to the Windows 2000 operating system. Windows 2000 and XP support two quite different partitioning schemes: the old DOS partitioning scheme and the new Dynamic Disk Management (DDM). The problem is that earlier versions of Windows do not support DDM. In addition, most hard disk utilities do not support it as well..
Restrictions
1. Do not use the Create Partition function in order to undelete the last deleted partition.
2. The program cannot create new partitions on Dynamic Disks. The current version of the program supports only hard disks that use the DOS partitioning scheme (in Windows 2000 and XP these disks are named Basic Disks).
3. According to the rules of the DOS partitioning scheme, the following combinations of partitions cannot be created:
- Two Extended Partitions on one hard disk
- Five or more Primary partitions on one hard disk
- If there is an Extended Partition is a partition type you create only on a basic MBR (Master Boot Record) disk. Extended partition is used if you want to create more than four volumes on a disk, since it may contain multiple logical drives. on the disk, only three Primary partitions are allowed
Starting Wizard
There are several ways to start the Create Partition Wizard:
- In the Main menu: select Wizards > Create Partition…
- On the Common Tasks bar: click the Create Partition item of the Wizards menu.
- In the Toolbar: click the Create Partition button.
After following one of the above mentioned actions, the Welcome page of the wizard is displayed.
Starting Dialog
In order to start the operation the user should take the following steps:
1. Select a block of free space on the Disk Map.
2. Call the Create Partition dialog to define appropriate settings:
- Call the popup menu for the selected partition (right click of the mouse button) on the Disk Map or on the List of Partitions, then select the menu item: Create Partition.
Settings
Despite different work algorithms, both the Create Partition Wizard and the Create Partition dialog provide the same level of functionality, thus let us just take as an example the dialog version of the operation.
Define the future partition parameters with the Create Partition dialog. Initially the program suggests some consistent values for all parameters. In most cases, the user can just press the Yes button to confirm the operation.
- Define whether the partition will be Primary, Extended or Logical. Select the desired type of the new partition from this pull-down list. As a matter of fact, the available alternatives fundamentally depend on the type of the selected block of free space - within the Logical free space, only Logical partitions can be created; Within the Primary free space, both Primary partitions or the Extended Partition can be created.
- Partition Size. Define the size (in MB) of the new partition.
- Free space before. Define the position (in MB) of the new partition relative to the beginning of the block of free space.
- Free space after. Define the amount of trailing free space (in Mb) at the end of the new partition.
- File system for new partition. From the pull-down list select a file system the newly created partition will be formatted to, otherwise the partition will remain unformatted (so that it will not be ready to use).
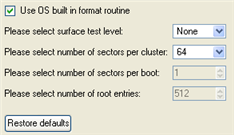
- Use OS built-in routine. Mark the option to restrict the available values according to the used OS.
- Whether the surface test will be performed. Mark the option to make the program perform the surface test on the formatted partition. In this case, the program will find bad and unstable sectors and mark them unusable in the file system metadata.
- The amount of sectors per boot. This parameter is available exclusively for FAT16 and FAT32 file systems. Set the number of sectors to be reserved for the boot area on the partition with this spinner control.
- The amount of root entries. This parameter is available exclusively for FAT16 file system. Set the maximum amount of files/directories to be placed in the Root Directory is the top-level directory of a formatted logical drive to include other files and directories. In modern file systems (Ext2/Ext3, NTFS and even FAT32) it does not differ from other directories. This is not the case for old FAT12 and FAT16 file systems. on the FAT16 partition.
- The amount of sectors per cluster is the smallest amount of disk space that can be allocated to hold a file. All file systems used by Windows organize hard disks based on clusters, which consist of one or more contiguous sectors. The smaller the cluster size, the more efficiently a disk stores information. If no cluster size is specified during formatting, Windows picks defaults based on the size of the volume. These defaults are selected to reduce the amount of space that is lost and the amount of fragmentation on the volume. A cluster is also called an allocation unit.. Define the Cluster Size for the formatted partition with this spinner control.
After the operation is completed the user receives a fully functional partition.
Format Partition
Any partition should contain some file system to be used for keeping data. The process of installing a file system is commonly known as formatting. A huge variety of file systems have been developed these days. The program provides the ability to format existing or newly created partitions of the following file systems:
- FAT12 & FAT16
- FAT32
- NTFS
- Ext2
- Ext3
- ReiserFS
- Linux Swap v. 2
- HPFS
Starting Wizard
There are several ways to start the Format Partition Wizard:
- In the Main menu: select Wizards > Format Partition…
- On the Common Tasks bar: click the Format Partition item of the Wizards menu.
- In the Toolbar: click the Format Partition button.
Starting Dialog
In order to start the operation the user should take the following steps:
1. Select a block of free space on the Disk Map.
2. Call the Format Partition dialog to define appropriate settings:
- Call the popup menu for the selected partition (right click of the mouse button) on the Disk Map or on the List of Partitions, then select the menu item: Format Partition.
Despite different work algorithms, both the Format Partition Wizard and the Format Partition dialog provide the same level of functionality, thus let us just take as an example the dialog version of the operation.
Define parameters of the formatting operation with the Format Partition dialog. Initially the program suggests some consistent values for all parameters. In most cases, the user can just press the Format button to confirm the operation.
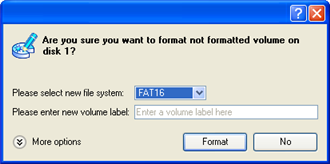
- File system. Select the desired file system type from this pull-down list. In fact, the program displays only file systems that can be correctly placed to the selected partition, taking the capacity of the selected partition into account.
- Volume label. Enter a label for the selected partition in this textual field. The Volume label or Partition Label is a small textual field (up to 11 characters) that is located in the partition's boot sector. This value is used for notification purposes only. It is detectable by any partitioning tool including the DOS FDISK utility. Modern operating systems save it within a file system, e.g. as a special hidden file. Thus it is able to contain a relatively large amount of text in multiple languages. is an irrelevant parameter of a logical drive that can be used for drive identification.
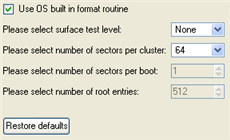
- Use OS built-in routine. Mark the option to restrict the available values according to the used OS.
- Whether the surface test will be performed. Mark the option to make the program perform the surface test on the formatted partition. In this case, the program will find bad and unstable sectors and mark them unusable in the file system metadata.
- The amount of sectors per boot. This parameter is available exclusively for FAT16 and FAT32 file systems. Set the number of sectors to be reserved for the boot area on the partition with this spinner control.
- The amount of root entries. This parameter is available exclusively for FAT16 file system. Set the maximum amount of files/directories to be placed in the Root Directory on the FAT16 partition.
- The amount of sectors per cluster. Define the Cluster Size for the formatted partition with this spinner control.
After the operation is completed the user receives a fully functional partition formatted to the file system specified.
Delete Partition
The program allows the user to delete partitions on hard disks partitioned with the DOS partitioning scheme. The program removes references to the partition from the Partition Table, so that the information from the deleted partition becomes inaccessible. The resulted disk space can be used to create new partitions.
Contents of the deleted partition do not disappear from the disk but merely are unavailable for the operating system.
Starting Wizard
There are several ways to start the Delete Partition Wizard:
- In the Main menu: select Wizards > Delete Partition…
- On the Common Tasks bar: click the Delete Partition item of the Wizards menu.
- In the Toolbar: click the Delete Partition button.
After following one of the above mentioned actions, the Welcome page of the wizard is displayed.
Starting Dialog
In order to start the operation the user should take the following steps:
1. Select a block of free space on the Disk Map.
2. Call the Delete Partition dialog to define appropriate settings:
- Call the popup menu for the selected partition (right click of the mouse button) on the Disk Map or on the List of Partitions, then select the menu item: Delete Partition.
Settings
Despite different work algorithms, both the Delete Partition Wizard and the Delete Partition dialog provide the same level of functionality, thus let us just take as an example the dialog version of the operation.
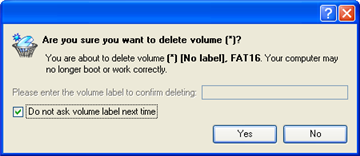
Define parameters of the delete operation with the Delete Partition dialog.
- Enter the volume label to confirm deleting. To confirm the deletion of the selected partition, enter its Volume Label. The actual Volume Label value is displayed above.
- Do not ask volume label next time. Mark the option to inhibit confirmation of the partition deletion.
Results
The deletion of a partition takes only a fraction of a second. However, the program waits until Windows completes the modification of the disk layout.
7Tools Partition Manager Help
Basic Concepts
Interface Overview
- General Layout
- Main Menu
- Tool Bar
- Virtual Operations Bar
- Common Tasks Bar
- Disk Map
- Explorer Bar
- List of Partitions
- Legend Bar
- Status Bar
Settings Overview
- General Options
- General Copy and Backup Options
- Hot Processing Options
- Partitioning Options
- Virtual Mode Options
- File System Conversion Options
- E-Mail Options
Getting Information about Disks
Partition Management
Hard Disk Management
Copy Tasks
Boot Management
Build Recovery Media
Extra Functionality
Copyright (C) 2018 www.partition-magic.com, All Rights Reserved. PartitionMagic ® is a registered trademark of Symantec Corporation.