
Partition Magic Software Partition magic software for Windows Server 2000/2003/2008/2008 R2/2012/2012 R2, Windows XP/Vista/7/8/8.1/10, etc.
Advanced Partitioning Operations
Here you can learn how to accomplish advanced partitioning operations (merge, redistribute free space, undelete, etc.) supported by the program.
Merge Partitions
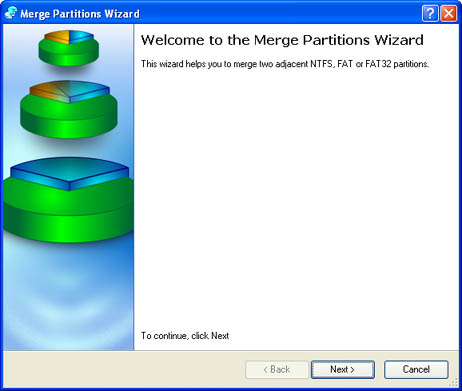
The Merge Partitions Wizard enables to consolidate the disk space, which originally belongs to two adjacent partitions, into a single, larger partition. The order, in which two partitions have been chosen, is important since the contents of the second selected partition will be placed in the folder of the first selected partition.
The program provides the ability to merge only NTFS, FAT16 or FAT32 partitions.
Starting
There are several ways to start the Merge Partitions Wizard:
After following one of the above mentioned actions, the Welcome page of the wizard is displayed.
Settings
The Merge Partitions Wizard allows the user to configure the settings and then start the operation in accordance with the entered parameters. Here the user sets the parameters of the operation defining:
Be particularly careful when selecting system partitions to process, since the incorrect order, in which two partitions have been chosen, will result in inability to boot the operating system.
Results
After the operation is completed the disk space of the two adjacent partitions will be consolidated.
Redistributing Unused Space between Partitions
The Redistribute Free Space Wizard helps to increase free space on one partition at the expense of unused space on others. By default, the wizard adds to the target partition the 50% of unused space of other partitions, which have been selected to donate space. The user can manually control what part of unused space will be left on a partition. The wizard automatically recalculates the positions of the partitions and moves their contents to new locations.
Starting
There are several ways to start the Redistribute Free Space Wizard:
After following one of the above mentioned actions, the Welcome page of the wizard is displayed.

Settings
The Redistribute Free Space Wizard allows the user to configure the settings and then start the operation in accordance with the entered parameters. Here the user sets the parameters of the operation defining:
After the operation is completed free space of the specified partition will be increased at the expense of unused space of the others.
Undelete Partition
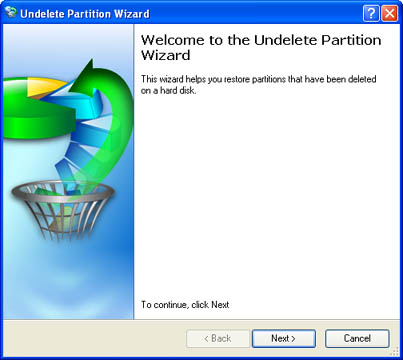
When deleting a partition, disk management software only removes references to it in the Partition Table so that a previously deleted partition can still be recovered (in case of valid restoration of the record in the Partition Table). The program provides the ability to find and recover these partitions. This function minimizes the hazard of occasional partitions deletion and is usually known as undelete.
A restored partition will be fully functional, as long as other partitions were not created, moved or exceeded the disk space occupied by the partition. That is why the program enables the Undelete Partition function only for blocks of free space.
The operation can be accomplished with the Undelete Partition Wizard.
Starting
There are several ways to start the Undelete Partition Wizard:
Settings
The Undelete Partition Wizard allows the user to configure the settings and then start the operation in accordance with the entered parameters. Here the user sets the parameters of the operation defining:
- A particular file system to look for;
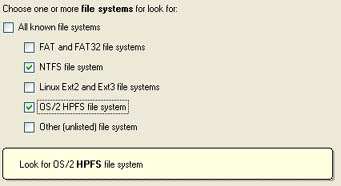
- Required search criteria.

To use the advance mode, a good knowledge of hard disk structure is required.
Results
After the operation is completed the user receives a fully functional partition.
Move & Resize Partition
The Move & Resize Partition function allows the user to modify the size and position of partitions on the hard disk keeping all on-disk information intact.
In order to move/resize a partition the user should take the following steps:
1. Select a partition on the Disk Map.
2. Call the Move/Resize Partition dialog to define appropriate settings. There are several ways to do it:
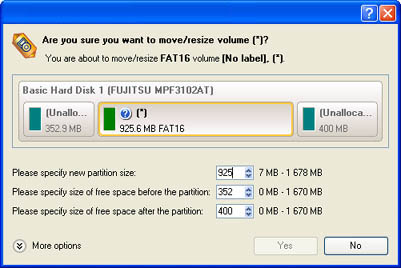
3. Define parameters of the operation with the Move/Resize Partition dialog.
Partition size and position may also be defined by using the drag-and-drop technique. To do that, just carry out the required operation on the Disk Map. The virtual operations are to be available.
In addition, there is the possibility to make further detailed settings (although the default values will do in most cases). To activate the advance mode, the user needs to click the More options button at the foot of the dialog page. The following options become available:
When resizing a FAT16 partition beyond the 2GB limit (maximum file system size), the partition will be automatically converted to FAT32.
The program enables to enlarge NTFS partitions (system, locked) without rebooting Windows and interrupting its work providing 100 percent guarantee that your data is kept intact.
4. The operation will be performed immediately after confirmation.
Convert File System
The program provides the ability to change the file system type without destroying data. While performing the operation, the program first checks for consistency the current file system and then verifies whether the on-partition data meet the requirements of the desired file system or not. After having passed the testing, the program re-organizes the file system metadata and user files.
The program enables to convert the following file system types:
- FAT16 > NTFS, FAT32
- FAT32 > NTFS, FAT16
- NTFS > FAT16, FAT32
- Ext2 > Ext3
In order to convert file system of a partition the user should take the following steps:
1. Select a partition on the Disk Map.
2. Call the Convert file system of partition dialog to define appropriate settings:
3. Define parameters of the operation with the Convert file system of partition dialog. Initially the program suggests some consistent values for all parameters. In most cases, the user may just press the Convert button to confirm the operation.

- New cluster is the smallest amount of disk space that can be allocated to hold a file. All file systems used by Windows organize hard disks based on clusters, which consist of one or more contiguous sectors. The smaller the cluster size, the more efficiently a disk stores information. If no cluster size is specified during formatting, Windows picks defaults based on the size of the volume. These defaults are selected to reduce the amount of space that is lost and the amount of fragmentation on the volume. A cluster is also called an allocation unit. size. Define the Cluster Size for the partition to convert.
The option is only available for FAT16>NTFS and FAT32>NTFS conversion.
The user can only decrease the current cluster size.
- Surface test level. Select from the pull-down list the surface test level.
4. The operation will be performed immediately after confirmation.
Change Cluster Size
Cluster Size is one of the important parameters of any file system. The Cluster Size value affects implicitly the performance of the files input-output activity since it defines the size of the file system metadata The servicing structures of a file system, which contain information about allocating files and directories, security information etc, are named the file system metadata. It is invisible for users and regular applications because its accidental modification usually makes a partition unusable.. Besides, the so-called waste space factor also depends on the Cluster Size value.
The program provides the ability to change the Cluster Size to any available value without destroying data.
In order to change the cluster size of a partition the user should take the following steps:
1. Select a partition on the Disk Map.
2. Call the Change Cluster Size dialog to define appropriate settings:
3. Define a new value with the Change Cluster Size dialog.
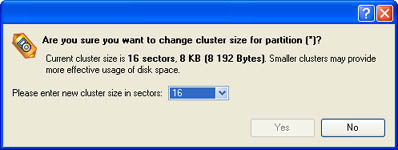
Sectors per cluster. Select a new cluster size value from the pull-down list.
The Cluster Size value is expressed in Sectors Per Cluster. To get the Cluster Size in Kbytes, divide it into half.
4. The operation will be performed immediately after confirmation.
Make Logical/Make Primary
The program provides the ability to include a Primary Partition in the Extended Partition is a partition type you create only on a basic MBR (Master Boot Record) disk. Extended partition is used if you want to create more than four volumes on a disk, since it may contain multiple logical drives., or exclude a Logical Partition from the Extended Partition, without partition duplication.
In order to change a partition type the user should take the following steps:
1. Select a primary or logical partition on the Disk Map.
2. There are several ways to Make Partition Logical/Primary:
The Make Primary > Logical option is only available when the selected partition is adjacent to the Extended partition and vice versa.
The Make Primary > Logical option of the system partition will result in inability to boot the operating system.
3. The operation will be performed immediately after confirmation.
Merge Partitions
The Merge Partitions Wizard enables to consolidate the disk space, which originally belongs to two adjacent partitions, into a single, larger partition. The order, in which two partitions have been chosen, is important since the contents of the second selected partition will be placed in the folder of the first selected partition.
The program provides the ability to merge only NTFS, FAT16 or FAT32 partitions.
Starting
There are several ways to start the Merge Partitions Wizard:
- In the Main menu: select Wizards > Merge Partitions…
- On the Common Tasks bar: click the Merge Partitions item of the Wizards menu.
After following one of the above mentioned actions, the Welcome page of the wizard is displayed.
Settings
The Merge Partitions Wizard allows the user to configure the settings and then start the operation in accordance with the entered parameters. Here the user sets the parameters of the operation defining:
- The partition to expand. Select a partition that will be expanded to take contents of an adjacent partition.
- The partition to merge with. Choose the second partition for the merge operation, the contents of which will be placed in the folder of the first selected partition. By default the program automatically offers a folder name to store files of the second partition, which however can be customized by the user.
Be particularly careful when selecting system partitions to process, since the incorrect order, in which two partitions have been chosen, will result in inability to boot the operating system.
Results
After the operation is completed the disk space of the two adjacent partitions will be consolidated.
Redistributing Unused Space between Partitions
The Redistribute Free Space Wizard helps to increase free space on one partition at the expense of unused space on others. By default, the wizard adds to the target partition the 50% of unused space of other partitions, which have been selected to donate space. The user can manually control what part of unused space will be left on a partition. The wizard automatically recalculates the positions of the partitions and moves their contents to new locations.
Starting
There are several ways to start the Redistribute Free Space Wizard:
- In the Main menu: select Wizards > Redistribute Free Space…
- On the Common Tasks bar: click the Redistribute Free Space item of the Wizards menu.
After following one of the above mentioned actions, the Welcome page of the wizard is displayed.
Settings
The Redistribute Free Space Wizard allows the user to configure the settings and then start the operation in accordance with the entered parameters. Here the user sets the parameters of the operation defining:
- The partition to enlarge. Select a partition, the size of which will be increased at the expense of other partitions. Blocks of free space, if any will be automatically added to the target partition.
- The partition to donate. Choose any partition (not only adjacent) to donate free space if available. By default, the program leaves 50% of the unused space on a partition and removes another 50% to add it to the target partition, however the size to take can be customized by moving the slider at the bottom of the page.
After the operation is completed free space of the specified partition will be increased at the expense of unused space of the others.
Undelete Partition
When deleting a partition, disk management software only removes references to it in the Partition Table so that a previously deleted partition can still be recovered (in case of valid restoration of the record in the Partition Table). The program provides the ability to find and recover these partitions. This function minimizes the hazard of occasional partitions deletion and is usually known as undelete.
A restored partition will be fully functional, as long as other partitions were not created, moved or exceeded the disk space occupied by the partition. That is why the program enables the Undelete Partition function only for blocks of free space.
The operation can be accomplished with the Undelete Partition Wizard.
Starting
There are several ways to start the Undelete Partition Wizard:
- In the Main menu: select Wizards > Undelete Partitions…
- On the Common Tasks bar: click the Undelete Partition item of the Wizards menu.
- Select a disk on the Disk map and click the Recover Lost Partitions item on the page that appears in the Explorer bar.
Settings
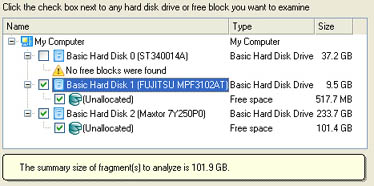
The Undelete Partition Wizard allows the user to configure the settings and then start the operation in accordance with the entered parameters. Here the user sets the parameters of the operation defining:
- Free blocks to scan for lost partitions. Choose a free block from a tree-like list of available disks and their partitions.
- Manual setting of search criteria. Activate the advance mode
 to manually specify:
- A particular file system to look for;
- Required search criteria.
To use the advance mode, a good knowledge of hard disk structure is required.
Results
After the operation is completed the user receives a fully functional partition.
Move & Resize Partition
The Move & Resize Partition function allows the user to modify the size and position of partitions on the hard disk keeping all on-disk information intact.
In order to move/resize a partition the user should take the following steps:
1. Select a partition on the Disk Map.
2. Call the Move/Resize Partition dialog to define appropriate settings. There are several ways to do it:
- Select in the Main menu: Partition > Move/Resize Partition …
- On the Explorer bar: click on the current total size value.
- Call the popup menu for the selected partition (right click of the mouse button) on the Disk Map or on the List of Partitions, then select the menu item: Move/Resize Partition…
3. Define parameters of the operation with the Move/Resize Partition dialog.
- Partition preview. The disk map displays the resulting disk layout after the move/resize operation is completed.
- Partition size. Define the size (in Mb) of the modified partition.
- Free space before. Define the position (in Mb) of the partition relative to the beginning of the available range of disk space.
- Free space after. Define the amount of trailing free space (in Mb) at the end of the available range of disk space.
Partition size and position may also be defined by using the drag-and-drop technique. To do that, just carry out the required operation on the Disk Map. The virtual operations are to be available.
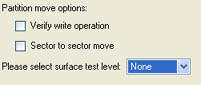
In addition, there is the possibility to make further detailed settings (although the default values will do in most cases). To activate the advance mode, the user needs to click the More options button at the foot of the dialog page. The following options become available:
- Verify write operation. Define whether the Writing Verification test will be accomplished during the operation or not.
- Sector to sector move. Activate the sector-to-sector mode (allows to process any file system, even unknown one).
- Surface test level. Select from the pull-down list the level of the surface test.
When resizing a FAT16 partition beyond the 2GB limit (maximum file system size), the partition will be automatically converted to FAT32.
The program enables to enlarge NTFS partitions (system, locked) without rebooting Windows and interrupting its work providing 100 percent guarantee that your data is kept intact.
4. The operation will be performed immediately after confirmation.
Convert File System
The program provides the ability to change the file system type without destroying data. While performing the operation, the program first checks for consistency the current file system and then verifies whether the on-partition data meet the requirements of the desired file system or not. After having passed the testing, the program re-organizes the file system metadata and user files.
The program enables to convert the following file system types:
- FAT16 > NTFS, FAT32
- FAT32 > NTFS, FAT16
- NTFS > FAT16, FAT32
- Ext2 > Ext3
In order to convert file system of a partition the user should take the following steps:
1. Select a partition on the Disk Map.
2. Call the Convert file system of partition dialog to define appropriate settings:
- Select in the Main menu: Partition > Convert file system…
- On the Explorer bar: click on the current file system type.
- Call the popup menu for the selected partition (right click of the mouse button) on the Disk Map or on the List of Partitions, then select the menu item: Convert File System…
3. Define parameters of the operation with the Convert file system of partition dialog. Initially the program suggests some consistent values for all parameters. In most cases, the user may just press the Convert button to confirm the operation.
- Current file system. The dialog allows the user to get information on the selected partition.
- New file system. The pull-down list contains file systems to convert to. The program only displays available variants, taking into account current parameters of the selected partition and the file system limitations.
- Convert options.
- New cluster is the smallest amount of disk space that can be allocated to hold a file. All file systems used by Windows organize hard disks based on clusters, which consist of one or more contiguous sectors. The smaller the cluster size, the more efficiently a disk stores information. If no cluster size is specified during formatting, Windows picks defaults based on the size of the volume. These defaults are selected to reduce the amount of space that is lost and the amount of fragmentation on the volume. A cluster is also called an allocation unit. size. Define the Cluster Size for the partition to convert.
The option is only available for FAT16>NTFS and FAT32>NTFS conversion.
The user can only decrease the current cluster size.
- Surface test level. Select from the pull-down list the surface test level.
4. The operation will be performed immediately after confirmation.
Change Cluster Size
Cluster Size is one of the important parameters of any file system. The Cluster Size value affects implicitly the performance of the files input-output activity since it defines the size of the file system metadata The servicing structures of a file system, which contain information about allocating files and directories, security information etc, are named the file system metadata. It is invisible for users and regular applications because its accidental modification usually makes a partition unusable.. Besides, the so-called waste space factor also depends on the Cluster Size value.
The program provides the ability to change the Cluster Size to any available value without destroying data.
In order to change the cluster size of a partition the user should take the following steps:
1. Select a partition on the Disk Map.
2. Call the Change Cluster Size dialog to define appropriate settings:
- Select in the Main menu: Partition > Modify > Change Cluster Size…
- On the Explorer bar: click on the current sectors per cluster value.
3. Define a new value with the Change Cluster Size dialog.
Sectors per cluster. Select a new cluster size value from the pull-down list.
The Cluster Size value is expressed in Sectors Per Cluster. To get the Cluster Size in Kbytes, divide it into half.
4. The operation will be performed immediately after confirmation.
Make Logical/Make Primary
The program provides the ability to include a Primary Partition in the Extended Partition is a partition type you create only on a basic MBR (Master Boot Record) disk. Extended partition is used if you want to create more than four volumes on a disk, since it may contain multiple logical drives., or exclude a Logical Partition from the Extended Partition, without partition duplication.
In order to change a partition type the user should take the following steps:
1. Select a primary or logical partition on the Disk Map.
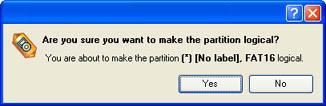
2. There are several ways to Make Partition Logical/Primary:
- Select in the Main menu: Partition > Modify > Make Partition Logical/Primary.
- On the Explorer bar: click on the current partition type.
The Make Primary > Logical option is only available when the selected partition is adjacent to the Extended partition and vice versa.
The Make Primary > Logical option of the system partition will result in inability to boot the operating system.
3. The operation will be performed immediately after confirmation.
7Tools Partition Manager Help
Basic Concepts
Interface Overview
- General Layout
- Main Menu
- Tool Bar
- Virtual Operations Bar
- Common Tasks Bar
- Disk Map
- Explorer Bar
- List of Partitions
- Legend Bar
- Status Bar
Settings Overview
- General Options
- General Copy and Backup Options
- Hot Processing Options
- Partitioning Options
- Virtual Mode Options
- File System Conversion Options
- E-Mail Options
Getting Information about Disks
Partition Management
Hard Disk Management
Copy Tasks
Boot Management
Build Recovery Media
Extra Functionality
Copyright (C) 2018 www.partition-magic.com, All Rights Reserved. PartitionMagic ® is a registered trademark of Symantec Corporation.