
Partition Magic Software Partition magic software for Windows Server 2000/2003/2008/2008 R2/2012/2012 R2, Windows XP/Vista/7/8/8.1/10, etc.
Partition Management
- In this chapter you will find all the information necessary to carry out partitioning operations supported by the program.
Basic Partitioning Operations
Here you can learn how to accomplish basic partitioning operations (create, format, delete).
Creating Partitions
The program provides the ability to create a new partition within a block of un-partitioned space.
Restrictions
1. Do not use the Create Partition function in order to undelete the last deleted partition.
2. The program allows creating new partitions only within blocks of un-partitioned space. It cannot convert a free space on an existing partition to a new partition.
3. The program cannot create new partitions on Dynamic Disks.
Express Create Partition Wizard Startup
In the Main menu: select Wizards > Express Create Partition…
Dialog Startup
1. Select a block of free space on the Disk Map;
2. Select in the Main Menu: Partition > Create Partition.
Express Create Partition Wizard Setup
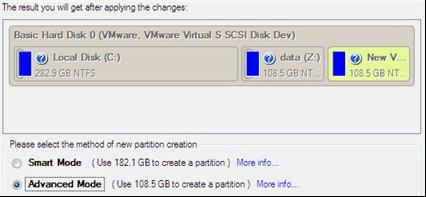
Thanks to a highly intelligent work algorithm, the wizard requires minimal involvement in the operation, thus you only need to choose a method you find the most suitable to create the partition (if several available), which actually differ in the amount of space to allocate. For easy perception, you can see the resulted disk layout on the disk map by selecting this or that mode.
Dialog Setup
Initially the program suggests some consistent values for all parameters. In most cases, you can just press the Yes button to confirm the operation.
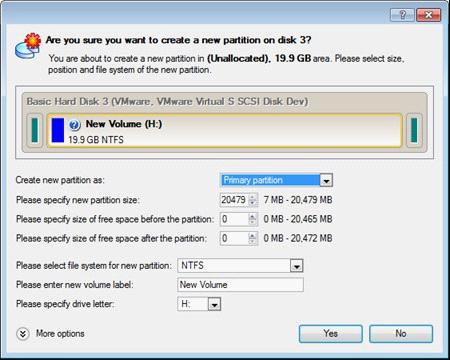
Define whether the partition will be Primary, Extended or Logical. You can choose the desired partition type from the pull-down list. As a matter of fact, the available alternatives fundamentally depend on the selected block of free space - within the Logical free space, only Logical partitions can be created; Within the Primary free space, both Primary partitions or the Extended Partition can be created.
Partition Size. Define the size (in Mb) of the new partition.
Free space before. Define the position (in Mb) of the new partition relative to the beginning of the block of free space.
Free space after. Define the amount of trailing free space (in Mb) at the end of the new partition.
File system for new partition. From the pull-down list select a file system the newly created partition will be formatted to, otherwise the partition will remain unformatted (so that it will not be ready to use).
Volume label. Enter a label for the selected partition in this textual field. It is an irrelevant parameter usually used for drive identification.
Drive letter assignment. The pull-down list contains vacant drive letters that can be associated with the newly formatted partition.
In addition, there is the possibility to make further detailed settings (although the default values will do in most cases). To activate the advance mode, you need to click the More options button at the foot of the dialog page. Depending on the chosen file system, the following options become available:
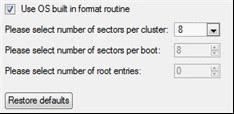
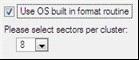
Use OS built-in routine. Mark the option to restrict the available values according to the used OS.
Whether the surface test will be performed. Define the level of the surface check to make the program find bad and unstable sectors and mark them unusable in the file system metadata.
The amount of sectors per boot. This parameter is available exclusively for FAT16 and FAT32 file systems. Set the number of sectors to be reserved for the boot area on the partition with this spinner control.
The amount of root entries. This parameter is available exclusively for FAT16 file system. Set the maximum amount of files/directories to be placed in the Root Directory on the FAT16 partition.
The amount of sectors per cluster. Define the Cluster Size for the formatted partition with this spinner control.
Result
After the operation is completed you receive a fully functional partition.
Available operation scenarios:
Creating a new partition to detach operating system from the rest of data
Formatting Partitions
Any partition should contain some file system to be used for keeping data. The process of installing a file system is commonly known as formatting. A huge variety of file systems have been developed these days.
Supported File Systems
The program provides the ability to format partitions of the following file systems:
- FAT12 & FAT16
- FAT32
- HFS+
- NTFS
- Ext2
- Ext3
- Ext4
- Linux Swap v. 2
Wizard Startup
In the Main menu: select Wizards > Format Partition…
Dialog Startup
1. Select a partition on the Disk Map;
2. Select in the Main Menu: Partition > Format Partition.
Wizard Setup
The wizard offers the following steps to accomplish the operation:
Partition to format. Select a hard disk (if the computer has several hard disks) and then the required partition to format.

- Partition properties. On the next page of the wizard you can set the following partition parameters:
- Partition type. From the pull-down list select the desired file system type. In fact, the program displays only those file systems that can correctly be placed to the selected partition, taking its capacity into account.
- Volume label. Enter a label for the selected partition in this textual field. It is an irrelevant parameter usually used for drive identification.
- Drive letter assignment. The pull-down list contains vacant drive letters that can be associated with the newly formatted partition.
In addition, there is the possibility to make further detailed settings (although the default values will do in most cases). To activate the advance mode, you need to mark the appropriate option at the foot of the page. When it is marked, the next page enables to define:
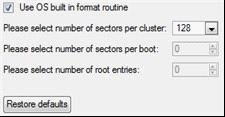
Use OS built-in routine. Mark the checkbox to restrict the available values according to the used OS.
Whether the surface test will be performed. Define the level of the surface check to make the program find bad and unstable sectors and mark them unusable in the file system metadata.
The amount of sectors per boot. This parameter is available exclusively for FAT16 and FAT32 file systems. Set the number of sectors to be reserved for the boot area on the partition with this spinner control.
The amount of root entries. This parameter is available exclusively for FAT16 file system. Set the maximum amount of files/directories to be placed in the Root Directory on the FAT16 partition.
The amount of sectors per cluster. Define the Cluster Size for the formatted partition with this spinner control.
Dialog Setup
Initially the program suggests some consistent values for all parameters. In most cases, you can just press the Format button to confirm the operation.
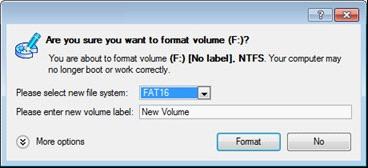
File system. From the pull-down list select the desired file system type. In fact, the program displays only those file systems that can correctly be placed to the selected partition, taking its capacity into account.
Volume label. Enter a label for the selected partition in this textual field. It is an irrelevant parameter usually used for drive identification.
In addition, there is the possibility to make further detailed settings (although the default values will do in most cases). To activate the advance mode, you need to click the More options button at the foot of the dialog page. Depending on the chosen file system, the following options become available:
Use OS built-in routine. Mark the checkbox to restrict the available values according to the used OS.
Whether the surface test will be performed. Define the level of the surface check to make the program find bad and unstable sectors and mark them unusable in the file system metadata.
The amount of sectors per boot. This parameter is available exclusively for FAT16 and FAT32 file systems. Set the number of sectors to be reserved for the boot area on the partition with this spinner control.
The amount of root entries. This parameter is available exclusively for FAT16 file system. Set the maximum amount of files/directories to be placed in the Root Directory on the FAT16 partition.
The amount of sectors per cluster. Define the Cluster Size for the formatted partition with this spinner control.
Result
After the operation is completed you receive a fully functional partition formatted to the specified file system.
Deleting Partitions
Wizard Startup
In the Main menu: select Wizards > Delete Partition…
Dialog Startup
In order to start the operation you should take the following steps:
Launcher
1. Select a partition on the Disk Map;
2. Select in the Main Menu: Partition > Delete Partition.
Wizard Setup
The wizard offers the following steps to accomplish the operation:
Partition to delete. Select a hard disk (if the computer has several hard disks) and then the required partition to delete.
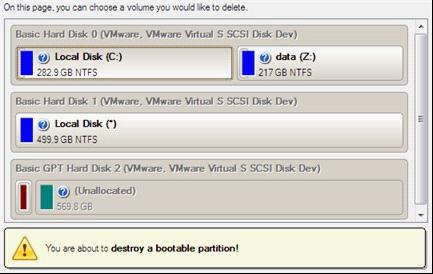
Merge free blocks. As a result of the operation you may get several blocks of the unallocated space on the hard disk. So choose whether to merge them all and place at the beginning of the disk or at the end by selecting the required operation from the pull-down list.

Dialog Setup
Initially the program suggests you just to remove references to the selected partition from the Partition Table.
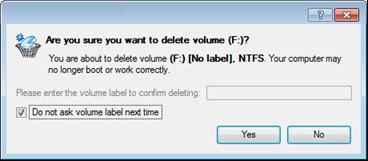
Enter the volume label to confirm deleting. To confirm deletion of the selected partition, enter its Volume Label. The current volume label is displayed above.
Do not ask volume label next time. Mark the option to inhibit confirmation next time you start the dialog.
Result
By default, the operation takes only a fraction of a second. However, the program waits until Windows completes the modification of the disk layout.
Advanced Partitioning Operations
Here you can learn how to accomplish advanced partitioning operations.
Redistributing Unused Space between Partitions
Express Resize Partitions Wizard
The Express Resize Partitions Wizard enables to easily increase free space on one partition by up-taking the unused space of an adjacent partition of your hard disk.
Startup
In the Main menu: select Wizards > Express Resize Partitions…
Setup
The wizard offers the following steps to accomplish the operation:
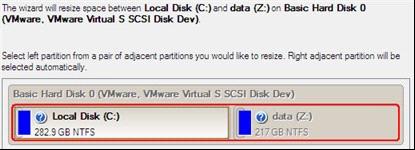
Adjacent partitions to resize. Click on the left partition of the pair of partitions you need to redistribute the unused space between, as the right one will be selected automatically.
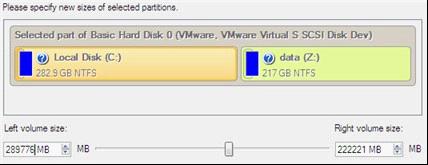
Resulted size of partitions. Redistribute the unused space between the partitions with the slider or manually by entering the required value.
Result
After the operation is completed the unused space between the specified partitions will be redistributed according to your needs.
Available operation scenarios:
Increasing size of a system partition by taking unused space of an adjacent logical partition
Moving/Resizing Partition
The Move/Resize Partition function allows you to resize or change location of any partition without destroying its data.
In order to move/resize a partition you should take the following steps:
1. Select a partition on the Disk Map.
2. Select in the Main menu: Partition > Move/Resize Partition…
3. Define parameters of the operation.
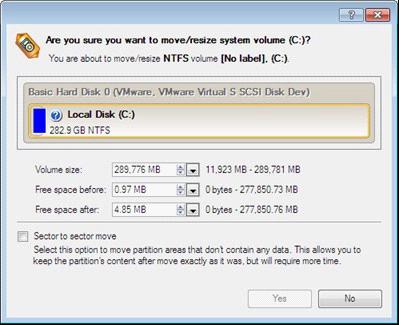
Volume size. Define size (in Mb) of the modified partition.
Free space before. Define the partition position (in Mb) relative to the beginning of the available range of disk space.
Free space after. Define the amount of trailing free space (in Mb) at the end of the available range of disk space.
Sector to sector move. Mark the checkbox to move the partition in the sector-by-sector mode to process its unused space as well. This can help to avoid problems with hidden data created by certain applications or the system administrator. However, it will take more time to accomplish the operation.
4. The operation will be performed immediately after confirmation.
Available operation scenarios:
Increasing size of a system partition by taking unused space from any other
Converting File System
With our program you can change type of the used file system without destroying its data. While performing the operation, it first checks the current file system for consistency and then verifies whether the on-partition data meet the requirements of the desired file system or not. After having passed the testing, the program re-organizes the file system metadata and user files.
The program enables to convert the following file system types:
- FAT16 > NTFS, FAT32
- FAT32 > NTFS, FAT16
- NTFS > FAT16, FAT32
- Ext2 > Ext3
In order to convert a file system you should take the following steps:
1. Select a partition on the Disk Map.
2. Select in the Main menu: Partition > Convert file system…
3. Initially the program suggests some consistent values for all parameters. In most cases, you can just press the Convert button to confirm the operation.
Resulted size of partitions. Redistribute the unused space between the partitions with the slider or manually by entering the required value.
Result
After the operation is completed the unused space between the specified partitions will be redistributed according to your needs.
Available operation scenarios:
Increasing size of a system partition by taking unused space of an adjacent logical partition
Moving/Resizing Partition
The Move/Resize Partition function allows you to resize or change location of any partition without destroying its data.
In order to move/resize a partition you should take the following steps:
1. Select a partition on the Disk Map.
2. Select in the Main menu: Partition > Move/Resize Partition…
3. Define parameters of the operation.
Volume size. Define size (in Mb) of the modified partition.
Free space before. Define the partition position (in Mb) relative to the beginning of the available range of disk space.
Free space after. Define the amount of trailing free space (in Mb) at the end of the available range of disk space.
Sector to sector move. Mark the checkbox to move the partition in the sector-by-sector mode to process its unused space as well. This can help to avoid problems with hidden data created by certain applications or the system administrator. However, it will take more time to accomplish the operation.
4. The operation will be performed immediately after confirmation.
Available operation scenarios:
Increasing size of a system partition by taking unused space from any other
Converting File System
With our program you can change type of the used file system without destroying its data. While performing the operation, it first checks the current file system for consistency and then verifies whether the on-partition data meet the requirements of the desired file system or not. After having passed the testing, the program re-organizes the file system metadata and user files.
The program enables to convert the following file system types:
- FAT16 > NTFS, FAT32
- FAT32 > NTFS, FAT16
- NTFS > FAT16, FAT32
- Ext2 > Ext3
In order to convert a file system you should take the following steps:
1. Select a partition on the Disk Map.
2. Select in the Main menu: Partition > Convert file system…
3. Initially the program suggests some consistent values for all parameters. In most cases, you can just press the Convert button to confirm the operation.
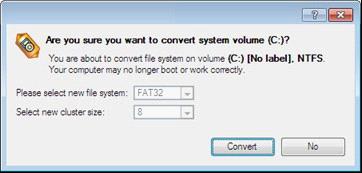
New file system. From the pull-down list choose a file system you would like to convert to. Actually the program only displays variants available for the operation, taking into account the current parameters of the selected partition and limitations of the used file system.
New cluster size. Define the cluster size for the partition. This parameter can have a profound effect on the overall performance. In a nutshell, larger clusters waste more space, but generally provide for slightly better performance, because of less fragmentation. So be particularly careful with it.
Surface test level. Define the level of the surface check to make the program find bad and unstable sectors and mark them unusable in the file system metadata.
4. The operation will be performed immediately after confirmation.
Changing Partition Attributes
This chapter explains how you can change partition attributes (Active flag, Hidden flag, Volume Label, etc.).
Mark Partition Active/Inactive
The program enables to set an active/inactive flag for primary partitions of a hard disk. By default, an operating system will boot only if its partition is active or bootable.
In order to mark a partition active/inactive you should take the following steps:
1. Select a primary partition on the Disk Map.
2. Select in the Main Menu: Partition > Mark Partition as Active/Inactive.
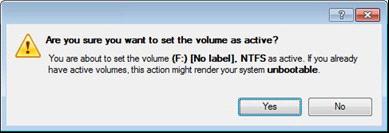
3. The operation will be performed immediately after confirmation.
Hide/Unhide Partition
The program allows you to hide/unhide primary and logical partitions. By default, an operating system does not mount hidden partitions, thus preventing access to their contents.
In order to hide/unhide a partition you should take the following steps:
1. Select a partition on the Disk Map.
2. Select in the Main Menu: Partition > Hide/Unhide Partition.
3. The operation will be performed immediately after confirmation.
Set Label of a Partition
The Partition Label is a small textual field (up to 11 characters) that is located in the partition's boot sector. It is detectable by any partitioning tool and is used for notification purposes only.
In order to change a partition label you should take the following steps:
1.Select a partition on the Disk Map.
2. Select in the Main Menu: Partition > Modify > Change Volume Label.
3. Enter a label for the selected partition.
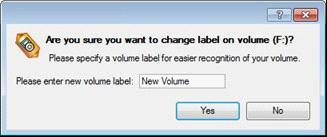
4. The operation will be performed immediately after confirmation.
Copyright (C) 2018 www.partition-magic.com, All Rights Reserved. PartitionMagic ® is a registered trademark of Symantec Corporation.